Map Your Imaginary World - Map and Play Games in your Imaginary World
An activity for kids from second through eighth grade,
but there is no real age limit.
By Julie Newdoll
www.brushwithscience.com
 .......
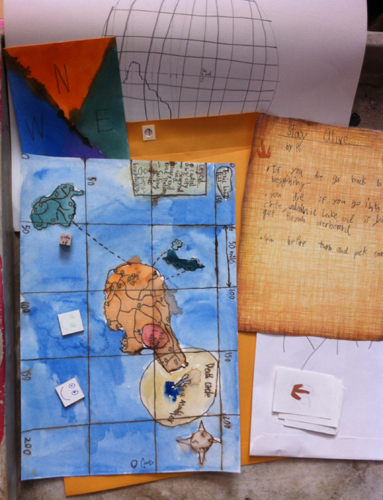
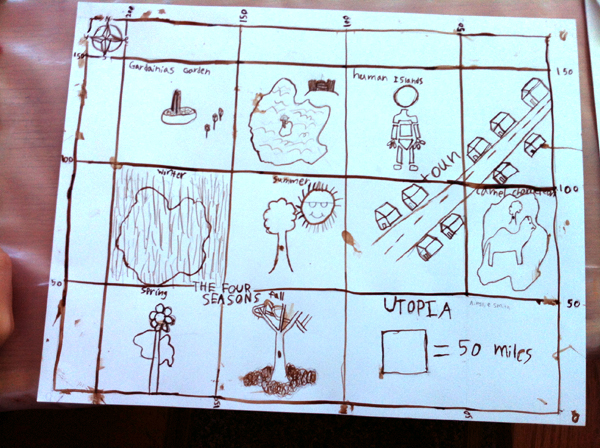
Map Game set in their imaginary world, by an eighth grader on the left, and a third grader on the right.
Introductory Story
Using an explorer related to the history of your region, find a reproduction of a map by this explorer, if you can, to show the group. I chose Lewis and Clark, being in the USA. The map on the right is a replica of one of their original maps.
One of the most amazing map facts about their journey is Clark estimated that they traveled 4,162 miles from the mouth of the Missouri to the Pacific, and the distance they recorded was only off by 40 miles!
For details, see http://www.pbs.org/lewisandclark/archive/1805.html

Part I - make a practice map of real surroundings.
This activity was done in six 40 minute sessions, giving time for some setup and cleanup. The practice map took up the first 40 minute session.
Materials:
- 1 sheet of paper
- 1 pencil
- 1 board or hard surface to write on while walking
- Straight edges to share, either rulers or wide wood strips the width desired.
- A yard stick, ruler or tape measure for measuring stride lengths
- At least one compass for the group, but preferably one compass per two persons.
Give each person a piece of paper, a pencil, and a hard board or some other surface they can put under the paper to write on it with a pencil while walking around. Give each pair a compass, or share with the leader.
Show the group how to orient the compass so that the needle and the N, north, symbol line up. Have them make a compass rose on their paper in one of the corners, with N, S, W, E where it should be by looking at the compass.
I get lots of questions at this point about how a compass works. The short answer is that the needle in a compass is magnetic, and like all magnets, it has a "magnetic south pole" and a "magnetic north pole". The earth also has a "magnetic south pole" and a "magnetic north pole", too. Confusingly, the earth's magnetic south pole points towards the geographic north pole and the magnetic north pole points towards the geographic south pole. The magnetic north end of the needle in the compass is attracted to the magnetic south pole of the earth, which is the geographic north pole. True north and magnetic north are similar, but not the same. See: http://www.ngdc.noaa.gov/geomag/declination.shtml

Part I continued - what to put on your maps
-
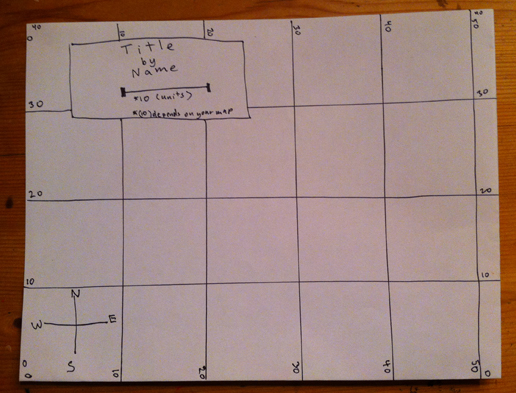
A rectangle for a legend with a title, the creator's name, and a scale bar with room for the units underneath, or some other way to indicate the distance between the grid lines. This can be anywhere on the map, but the example on the right shows one possibility.
-
A Compass Rose, which is some representation of north, east, south and west. This should go in a corner for the practice map.
-
Equally spaced grid lines in both the north-south and the west-east direction. YOU WILL NOT PUT THE DISTANCE NUMBERS ON YET!
-
You will determine the distance for the unit bar and the numbers to put on the grid lines later. Note, however, that the numbers on the north-south vertical lines are sideways, while the numbers on the horizontal east-west lines are upright.
Part I continued - the Practice Map
If possible, take the group outside. Perhaps they can imagine they are exploring new territory. Sidewalks could be rivers and trees could be forests. Some prefer to be realistic about what they are seeing, and that is fine, too.
Face a landmark, such as a tree, stairway, or other object in the distance. Look at the compass and see which direction this is. It would be easiest if it were due north, south, east or west at this stage. Have everyone orient their paper so that their compass rose also points this direction. Make sure EVERYONE is lined up properly.
In the map on the right, you can see that first we drew an X at our starting point. This should be at the extreme edge of the page so that there is room to travel and mark your path. In this case, we began by looking "west". We oriented our paper so that the "X" was closest to our body and the "W" on the compass rose faced away from us.
Looking at our landmark, I had them make a dashed line every time they took FIVE steps. If you are covering more ground, you can make this number ten, it is up to you. For younger kids, you can make it really easy by drawing a dashed line every time they take a step, but you won't get very far before running out of map!
When we got to the landmark, they drew a little picture of it and labeled it. Then we turned a new direction towards a new landmark and repeated this until we all had the idea. For fun, you can hide something at the last landmark - your treasure! I hid the Lewis and Clark map there, which they found fun to look at after having just done their own exploring and mapping.
Take the rough maps back to a desk. Have teams of two measure from heel to heel one step taken by a partner using a tape measure or ruler. Figure out the distance each dashed line represents on the map. If you made a dashed line every step, your measurement would be the distance. If you made a dash every five steps, you would multiply this distance by 5.
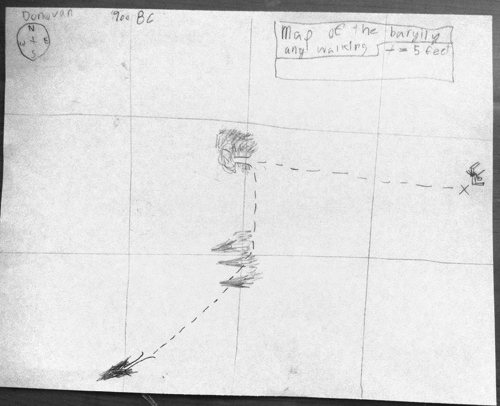
To save time, I took one student and we measured their stride and multiplied by five. This we rounded off to a number that was easy to work with for them. It was usually about ten feet per dashed line. In the map above, "Map of the Baryily Any Walking", it is about six dashes between grid lines, so about sixty feet. This would make the numbers on the grid lines:
0, 60, 120,180
on the above map. Numbers are written sideways on the vertical grid lines, where 0 is on the leftmost corner. They are oriented up and down on the horizontal grid lines. In a real map, we might be working with latitude and longitude, but that is another project!
Have them help you do the multiplication, or if they are old enough, have them work it out in teams and later compare their strides and their grid line numbers. Make sure everyone gets this right before moving on.
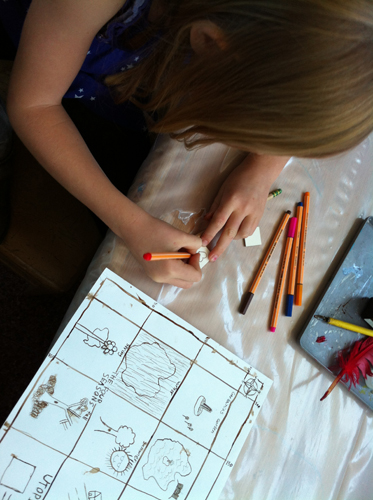
Part II - design your imaginary world in pencil and then outline.
The pencil usually takes a whole 40 minute session, and the ink and outline a second session. If anyone finishes early, have them draw a globe, if you have one, on a separate piece of paper, looking carefully at the lines of latitude and longitude. If you do not have a globe, have a real map handy for them to study and copy.
Materials: Each person gets one sheet of stiff paper that works well with ink and watercolor, or the best paper possible glued on to cardboard. Thin felt pens or feathers and ink are used to make outlines.
Optional:
-
A compass rose.
-
Regular grid lines in both directions.
-
A legend with a title, creator, and distance bar or other indicator.
-
numbers on their grid lines.
Then, they make their world however they like. For fun, we made the map first in pencil. Then we used feathers and brown ink to go over the lines, so it looked more like a Lewis and Clark map. I also had some real ink pens with metal tips that they could dip in the ink for finer lines, but this could all be done with thin felt pens, or fine brushes and watercolor.
If you don't use ink, you should still have them outline with fine felt tip pens or something similar before doing any color.
Part III -Painting.
This took one 40 minute session.
Materials:
Watercolors, or other color media to decorate maps if desired.
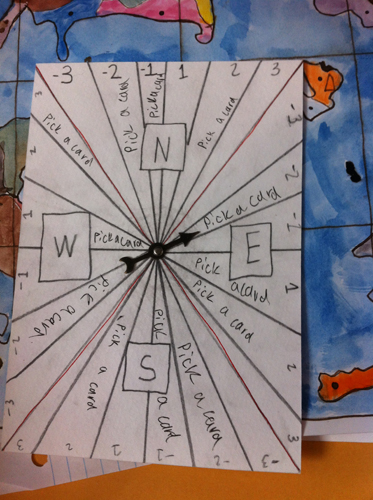
We painted the maps with watercolors, if they wanted color. It really helps if everything is outlined first in ink or felt pen. We also designed and painted the spinner cards. For the younger kids, this was usually just a stiff card divided into four quadrants with N, S, E and W in the quadrants. Older kids were sometimes more elaborate, but it was up to them.
Spinner cards, if using them, should be painted before the next session so they are dry for inserting the spinner needle.
Part IV - Game Cards, Pieces and Spinners
Materials:
-
Spinner needle with brads. I bought packs of 48 for 3.49 at my local craft supply. I have never used this company, but you can see them here:
http://shop.hobbylobby.com/products/tim-holtz-idea-ology-game-spinners-875807/
-
If no spinners possible, you will need to get or make cubes. I like these people:
http://www.craftparts.com/square-block-cubes-p-2628.html -
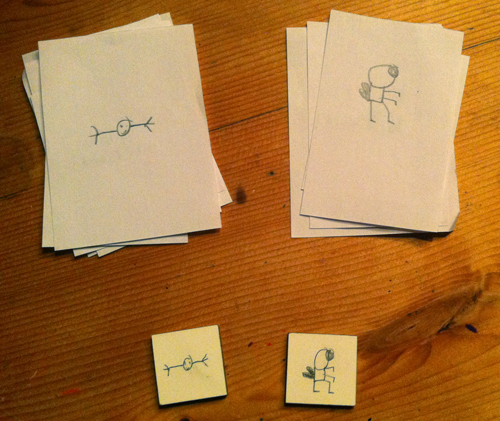
Game pieces are up to you. I used little square tiles I found that were white on one side, which they decorated with fine felt tip pens.
-
Felt pens, paints, or other means to decorate game pieces, spinners and cards.
If you do not have access to spinner needles with brads, you can make dice out of wooden cubes, out of air-dry clay or stiff paper folded into a cube and taped or glued together. Four faces will have N, S, W, and E, and the remaining faces will have whatever the creator wishes.
.
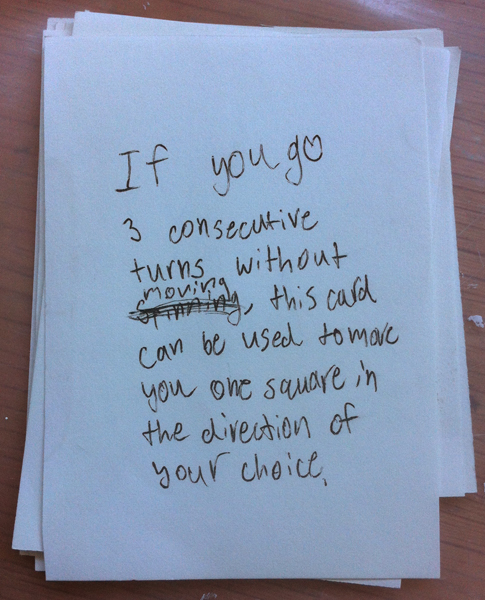
A really important part of the games are the game cards. They could make as many as they wanted, but usualy they made about eight out of a single sheet of paper, folded and cut, like the one on the right. If you have the resources, you can also cut up blank index cards for stiffer game cards. The card on the right has an example instruction by a player that noticed you can't go farther if you are at the extreme edge of the map, and sometimes get stuck there several turns!
.
Part V - the rules and playing the games together.
This part took up the remaining sessions. It takes a while for them to play each other's games. The only materials required are black pens, pencils, and hopefully a special piece of paper to write the rules on. The rules are a very important part. If you can, get them some interesting paper to put the rules on, and then they take it very seriously.
If they are older, you can have them write the rules down on scratch paper first. Then, they play their game three times with three different partners to refine their rules. You can also have them watch a pair of players play their game. Once their rules are ready, give them a nice piece of paper for the final draft.
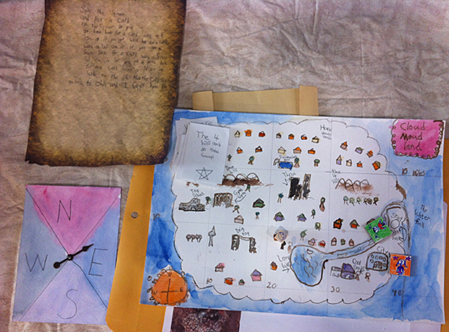
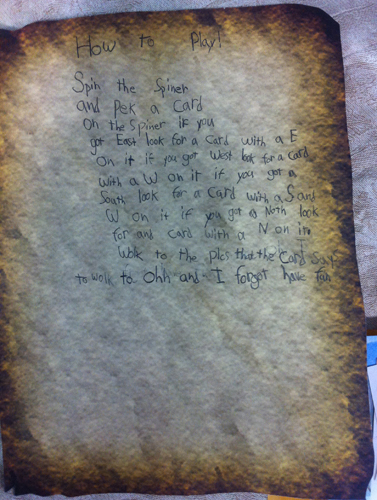
On the right are sample rules from a younger player (second or third grade). I just love the last line, "Oh, and I forgot have fun."
Part VI - packaging up the game.
All the kids wanted to immediately take their games home to play them with friends and family. All small pieces were put into an envelope. This was put into a larger envelope that the board could also fit in. You can use large pieces of newsprint to make envelopes for the whole game. Just stack two large sheets of newsprint on top of each other, for strength, fold them in half, then fold in the sides a little and staple the sides. Make sure there is enough room to fold down the top for a flap to keep the game from falling out. If you can make something sturdier, that is even better. This was a lot of work!
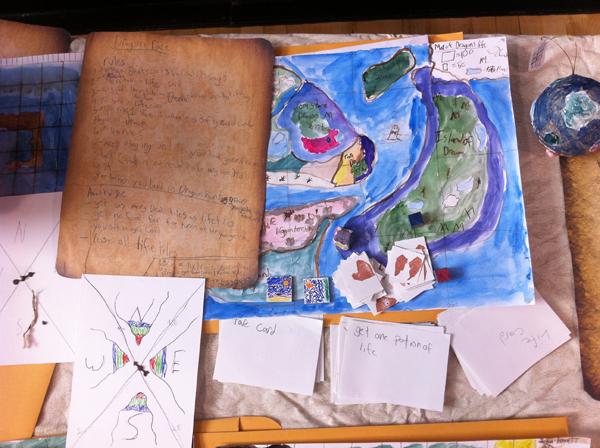
Here are some complete games. The game on the right used rubber stamps cut out of eraser material to stamp the back of their game cards. Their rules were designed so that you can play the game by yourself. There were a few ways the game would end; run out of life tiles, have the same number of life tiles as death tiles, do not get food for five turns, and get too cold.
Before sending them home, discuss the possibility with the school community of keeping a copy of the games at the school to play throughout the year. if you can make color (or even black and white if necessary) copies of the rules and the boards and the pieces, you will have games for the class to continue playing. Whoever plays it may have to cut out the cards and pieces first and construct the spinner.
Possibilities - a game exchange!
It would be really fun to set up a game exchange with other schools using copies of the games. This way, there would always be new games to play with totally different perspectives than the games out there designed by adults. I was completely surprised at the different worlds, rules and strategies required to play their games.
This would require that the rules had been tested, copied very neatly and the game cards were legible. This, in itself, would be a good exercise for some students.
Stay tuned for the next map related adventure - make a globe of your imaginary planet!
Map Your Imaginary World and Make it a Game from Julie Newdoll on Vimeo.